Chocolate comfort food for the cold weather from breakfast to dinner (gluten free and dairy free!)

Vegan Gluten Free Banana Pancakes
adapted from: the simple vegan blog
Prep time
10 mins
Cook time
25 mins
Total time
35 mins
These pancakes are vegan and gluten-free. Its the best pancakes recipe I’ve ever tried. This is a healthy version with less cholesterol and fat.
Author: Simple Vegan Blog
Recipe type: Dessert, Breakfast
Cuisine: Vegan, Gluten-free
Ingredients
• 1 cup rice flour (150 grams)
• 1 cup oat flour (120 grams)
• 2 teaspoons gluten-free baking powder
• ½ teaspoon salt
• 1 cup milk alternative (250 milliliters)
• 2 tablespoons honey or agave syrup
• 2 teaspoons vanilla extract
• 1 tablespoon coconut oil
• 2 bananas
Instructions
1. Mix dry ingredients in a bowl (rice flour, oat flour, baking powder, salt and cinnamon).
2. Mix wet ingredients in another bowl (milk, honey or agave syrup, vanilla extract and oil). Add sliced bananas and blend until smooth. You also can add smashed bananas, so you won’t need to blend.
3. Combine dry and wet ingredients with a blender or with a wood spoon.
4. Place ¼ cup of batter in a hot pan lightly greased and cook for about two minutes for each side.
5. Serve with sliced dairy free butter and or banana and syrup.
Nutrition Information
Serving size: 1 pancakes Calories: 136 Fat: 2.4 g Saturated fat: 0.4 g Carbohydrates: 25.7 g Sugar: 5.8 g Sodium: 167.5 mg Fiber: 1.9 g Protein: 2.8 g
Gluten Free Banana bread of muffins
Gluten free Vegan Banana Bread
adapted from a house in the hills
INGREDIENTS
• 1 cup GF coconut flour
• 1 cup GF all purpose flour or brown rice flour
• 1/2 teaspoon baking soda
• 1/2 teaspoon baking powder
• 1/4 teaspoon salt
• 1/2 cup coconut oil (melted)
• 1/2 cup vegan chocolate chips or cacao nibs
• 3 very large, very ripe bananas
INSTRUCTIONS
• Preheat oven to 375 F.
• In a large mixing bowl sift together 1 cup GF oat flour and 1 cup GF all purpose flour.
• Add baking soda, baking powder and salt to mixing bowl and whisk together.
• In a medium mixing bowl, use a fork or your hands to mash the peeled bananas.
• Add mashed bananas, chocolate chips and liquid coconut oil to the dry ingredients and mix gently, being careful not to over-stir.
• Spoon mixture into a lightly oiled 5 x 9 inch loaf pan. Add extra chocolate chips on top (optional but strongly suggested!).
• Bake for 20-30 minutes, until top is lightly browned and a toothpick can be inserted and removed batter- free!
How To Make Dairy and Gluten-Free Macaroni and Cheese
adapted from drkimcom
Posted by Dr. Ben Kim on Jan 04, 2013
As mentioned in my post on The Best Way To Get And Stay Healthy, if you are looking to overcome any chronic health challenge, one of the best first steps that you can take is to avoid conventional dairy and grains that contain gluten. To put it simply, pasteurized and homogenized dairy and gluten are common triggers for inflammation throughout the body.
I realize that for some, it can be quite daunting to imagine a diet that doesn’t include cheese and pasta. Which is why I thought it would be a good idea to share dairy and gluten-free options for macaroni and cheese.
Mind, you, the following options aren’t going to taste just like traditional mac and cheese made with conventional elbow macaroni, cheddar cheese, and milk. But I think they’re definitely worth a try, as they’re the best of many dairy and gluten-free versions that I’ve tested over the past while.
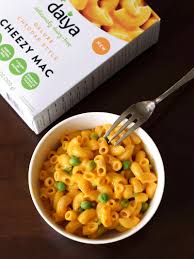
The first option is the easiest, and relies on a vegan shredded cheese product called Daiya.
Daiya is the only vegan cheese that I’ve found on the market that doesn’t contain substantial amounts of casein, the milk protein found in many soy and rice cheese products. In fact, it doesn’t contain even a trace of casein. And yet, it tastes more like real cheese than any other non-dairy cheeses that I’ve tested. Daiya cheese is made on the west coast of Canada, and is readily available in natural health food stores throughout North America.
Is it as healthy for you as avocados and lettuce? Nowhere close, of course, but if having a little Daiya cheese once a week allows you to avoid regular cheese made with pasteurized and homogenized dairy, I think it’s a fine choice.
The list of ingredients for Daiya cheese reads as follows:
Filtered water, tapioca flour, expeller pressed non-GMO canola and/or safflower oil, coconut oil, pea protein, salt, vegan natural flavours, inactive yeast, vegetable glycerin, xanthan gum, citric acid (for flavour), titanium dioxide (a naturally occurring mineral).
Again, I’ll never argue that this type of processed “healthy” substitute is better for you than actual legumes, vegetables, and fruits. Presenting Daiya cheese as an option for an occasional indulgence that is relatively healthy is my way of encouraging manageable steps toward positive overall change in dietary choices.
For pasta, there are many gluten-free choices at health food stores and even regular grocery stores these days. We’re partial to one called Rizopia, also made in Canada. This particular one is made with brown rice flour.
Boil your brown rice macaroni as you would regular pasta, and once at your desired consistency, drain and transfer serving portions to bowls.
While your pasta is still steaming, add a small handful of Daiya cheese shreds. This is a picture that I snapped right after adding the shreds.
As you give the pasta and cheese a good mix, the shreds will begin melting, giving more of a traditional mac and cheese mouth-feel. I actually prefer the shreds being mostly unmelted, as the raw cheese shreds have a unique texture that I quite enjoy. But if you like a creamy consistency to this dish, you can even put it in the toaster oven for a few minutes – this is how Daiya cheese shines brightest for most people, as it melts and stretches just like regular dairy cheese.
If Daiya cheese isn’t available where you live or you would prefer something even more natural, you can make your own dairy and gluten-free cheese-like sauce with cashews.
I like using raw cashews, a good two cups’ worth to make about four large servings of creamy sauce. Raw cashews are now readily available in grocery stores – have a look in the bulk foods section.
Ideally, you want to soak these nuts for a good six hours or overnight.
Once finished soaking, drain the water and use a strong blender to blend the nuts, enough water to fully cover the nuts, a teaspoon of garlic, the juice of a quarter lemon, and sea salt, to taste, until you’re left with a creamy sauce, which you can serve over the pasta.
If you want even more of a cheese-like flavor, you can add a bit of nutritional yeast before blending. You’ll want to fiddle a bit with ratios of sea salt, garlic, and lemon juice to create a sauce that best suits your palate. And if you have some fresh herbs on hand, adding a sprig or two will really bring this dish alive for family and friends.
By the way, the cashew cheese sauce, if made with just water and nuts, can actually be a decadent dairy and gluten-free substitute for whipped cream – I’ll put up another post shortly that shows how I use this whipped cream to create a simple and highly satisfying dessert.
If you’d like to print the directions in this post without the photos, please cut and paste the following into your word processor of choice and print from there:
Ingredients:
Gluten-free pasta
Daiya cheese or all of the following:
2 cups raw cashews,
Fresh lemon juice
, Garlic ,
Sea salt,
Fresh herbs for garnish
Directions:
Boil your brown rice macaroni as you would regular pasta, and once at your desired consistency, drain and transfer serving portions to bowls.
While your pasta is still steaming, add a small handful of Daiya Cheese shreds. As you give the pasta and cheese a good mix, the shreds will begin melting, giving more of a traditional mac and cheese mouth-feel. If you like a creamy consistency to your mac and cheese, you can even put it in the toaster oven for a few minutes (an oven-safe bowl with the pasta and Daiya Cheese shreds combined).
For Cashew Cheese Sauce
Soak two cups of raw cashews for a good six hours or overnight – this will make about four generous servings of cheese sauce.
Once finished soaking, drain the water and use a strong blender to blend the nuts, enough fresh water to fully cover the nuts, a teaspoon of garlic, the juice of a quarter lemon, and sea salt, to taste, until you’re left with a creamy sauce, which you can serve over the pasta. If you prefer a lighter consistency to your cheese sauce, add a little more water and seasoning, to taste.
If you want even more of a cheese-like flavor, you can add a bit of nutritional yeast before blending. You’ll want to fiddle a bit with ratios of sea salt, garlic, and lemon juice to create a sauce that best suits your palate. And if you have some fresh herbs on hand, adding a sprig or two will really bring this dish alive for family and friends.
Hope you have a chance to try and enjoy!
GF chocolate chip cookies
Adapted from ambitious kitchen
Whip up these coconut flour chocolate chip cookies in under 20 minutes. Only 1 bowl needed! They’re grain free, paleo, gluten free and dairy free.
INGREDIENTS
• 3/4 cup unsalted creamy almond butter or sun flower seed butter
• 1/2 cup organic coconut sugar or 1/4 -1/3 cup of honey
• 2 tablespoons coconut oil, melted and cooled
• 2 eggs
• 1/4 cup coconut flour or brown rice flower
• 1/2 teaspoon baking soda
• 1/4 teaspoon salt
• 1/3 cup dairy free dark chocolate chips
INSTRUCTIONS
1. Preheat oven to 350 degrees F. Line a cookie sheet with parchment paper.
2. In the bowl of a food processor, add in almond butter, coconut sugar and coconut oil; process until it comes together, about 1 minute. Add in eggs and process again. The dough will probably seize up at this point, but don’t worry that’s okay.
3. Next, add in coconut flour, baking soda and salt; process again until a dough forms. Gently fold in chocolate chips.
4. Use a cookie scoop to drop dough onto prepared cookie sheet. You can flatten dough with the palm of your hand if you’d like to have cookies like mine in the photo, or if you prefer, you can leave the dough as is and cookies will be a bit puffier.
5. Bake for 8-10 minutes or until cookies turn slightly golden brown around the edges. Allow them to cool on cookie sheet for at least 5 minutes, then transfer to a wire rack to finish cooling. Repeat with remaining dough. Makes around 20 cookies.
NOTES
Check above for recipe substitutions.
Recent Comments